Ever wondered why your ink bleeds on paper while in a video tutorial, using the same tools, there’s no issue? Or why someone else’s writing ink is shiny and vibrant while yours seems dull? Maybe you’re frustrated with watery ink that won’t give you those crisp, clean lines?
The secret to solving these problems lies in a simple but powerful ingredient: a binder, or binding agent. In this article, we’ll learn what binding agents are, how they work, and how adding them can transform your ink’s performance—from preventing bleeding to adding that sought-after shine.
Binders are the “gluey friends” of ink. These substances help bind pigments, improve ink flow, and enhance adhesion to surfaces. While there are several types of binders, one of the most commonly available and effective is gum arabic.

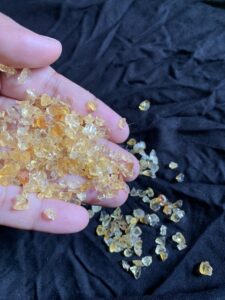
Did you know that the gum arabic we’ve been using as a binder in our calligraphy ink is made from an edible source? Yes, you read it correctly. Gum acacia, often known as gum arabic, is a naturally occurring gum derived from the hardened exudates of the Acacia senegal and Acacia seyal trees. The gum is made from Acacia species that are cultivated primarily in arid and semi-arid regions of Africa and Asia. Sudan is the world’s biggest producer and exporter of Gum Arabic.
The term “gum” refers to a substance that has a mixture of chemical compounds that are able to produce gels; gum is used in our inks because of this capability. The gel forming properties keep our ink from bleeding and help the ink bind to the paper, giving it a glossy appearance.

Why not use the original gum, if it is so freely available? We can certainly make use of that natural gum. I used it personally and found it to be effective. The raw gum arabic derived from plants and widely utilised in various households as a food source naturally has a slight colour. Gum arabic that is commercially accessible is treated to reduce microbial burden and increase transparency. The clearer the gum, the less it will interfere with the colour of the pigment. However, in the long run, microbial load reduction is required to prevent contamination, which can damage the artworks. According to basic microbiology principles, untreated gum with a high microbial load may promote organism growth when in contact with the atmosphere. Commercially added preservatives eliminate the possibility of bacteria growth and artwork contamination.
Using raw gum arabic is absolutely fine, especially for everyday practice since it’s more affordable. However, for artworks that you want to preserve, it’s best to use commercially produced gum arabic for long-lasting results
How to make home-made gum arabic
Step 1. Combine one part crystals and three parts water.
Step 2. Mix them in either hot or normal room temperature water.
Step 3. Stir for the first few minutes, then let aside for 30-45 minutes to allow the crystals to dissolve.
Step 4. All of the settled crystals will be a bit sticky, so stir it vigorously this time.
Step 5. Filter and remove the impurities using a fine sieve.
Your very own DIY affordable Gum arabic is ready to use with your inks.
Let’s Clear Things Up!
How long does homemade gum arabic last?
When stored properly in an airtight container in a cool, dry place, homemade gum arabic can last for several months. However, check for any changes in texture or smell before use.
What are the benefits of using homemade gum arabic over commercial options?
Homemade gum arabic can be more economical, allows you to control the quality of ingredients, and can be tailored to your specific needs in terms of thickness and adhesive properties.
My gum arabic mixture is too thick. What should I do?
If your mixture is too thick, try adding a small amount of warm water and stirring until you achieve your desired consistency. Be cautious not to add too much water at once.
How do I know if my homemade gum arabic is the right consistency for calligraphy?
The ideal consistency for calligraphy is similar to that of honey or syrup. It should be thick enough to bind well with pigments but still fluid enough to flow smoothly from your writing tool.
I see lumps in my gum arabic mixture. How can I fix this?
Lumps can form if the gum arabic was added too quickly to water. To fix this, strain the mixture through a fine mesh sieve or cheesecloth to remove the lumps.
How should I prepare gum arabic ink for my fountain pen?
To use gum arabic ink in a fountain pen, dilute it with water to achieve a thinner consistency, which ensures better flow and prevents clogging. Additionally, choose a pen with a larger nib for optimal performance.
How do I maintain my fountain pen when using gum arabic ink?
To prevent clogging and residue buildup, clean your fountain pen thoroughly after each use. Regularly flushing it with water is essential, as gum arabic can dry and create a sticky residue.
Will the color separate in gum arabic ink?
Yes, homemade gum arabic ink may exhibit some color separation over time. Be sure to shake the ink well before each use to ensure the pigments are mixed properly.
We’d love to hear your experiences! Share any challenges you faced and how you overcame them while using homemade gum arabic in your calligraphy practice. Let us know in the comments.


